For my Guy Fawkes/November scene I came up the idea of having an outdoor landscape, night sky, a flaming bonfire with silhouettes of people standing around.
To begin creating my scene I first drew out a displacement map image in Photoshop of the shape of the landscape I wanted to use in my scene. I created a plain in 3Ds max and placed a displace modifier on top so I could import my image onto the plain. By increasing the “strength” I was able to produce the landscape, and by increasing the blur and applying a mesh smooth modifier I was able to smoothen the landscape out to be more realistic.
To create my bonfire I first created a pyramid with a wood texture applied. I then used the cylinder and clone tool to make logs to be placed against the pyramid. I placed a second wood texture onto the logs.
Next I wanted to create the fire effect for the bonfire. I spent a large amount of time following help on the internet trying to follow instructions on how to create fire, however I couldn’t get anything to work. So I used the snow particle emitter option and instead of having the snow fall down. I rotated the particle emitter around so it would shoot the snow upwards. I then changed the parameters, such as the size of the flakes, and the shape and colour to make it appear as fire. I then changed how long and how big the particles would become over a set amount of time.
Within the material library I created the texture of the fire and smoke by changing the parameters under diffuse colour, specular colour, specular level, self illumination and opacity, all with particle age maps.
Within these maps I was able to add noise and other effects to create a realistic fire colour and texture, also to make the fire turn to smoke as it went higher.
Like I did with my other scenes I created a large sphere to place my whole landscape within so I could place a sky texture along the inside. The sphere also creates a better light source within the render as well.
I placed a free spot light with ray traced shadows turned on to point at the bonfire area. This however left the background landscape a little too dark, so I added an extra Omni light in the background area to brighten it up slightly.
To finish off my scene I added some leaves textures around the bonfire and some people standing around the fire.
To create the people I made a sphere with low amount of segments and with smooth turned off to give a less perfectly rounded head. A simple box for all the body parts and a sphere for the joints was a simple enough approach as they were only to be used as silhouettes with no detail.
Once I was happy with the overall scene I rendered a few different images from different locations.
These are the final images from my Guy Fawkes/November scene.
Monday, 10 November 2008
Sunday, 9 November 2008
3D Summer Scene
For my June/Summer 3D scene I came up with the idea of having a bright, grassy island with a clear river running through a valley, with trees and a butterfly in the air.
To begin with I first created another hi-res 3000px by 3000px displace map of the shape of the landscape.
I created a plain with plenty of length and width ways segments, with a displace modifier and used the “strength” selection to create the landscape with a mesh smooth modifier on top.
I then created a second plain and placed it just above the base of the landscape. I used this plain as my water object.
To create the water material I scrolled down to the Maps selections and under reflection I chose the flat mirror option. This creates a good reflection surface for the water, but it is too still, so I applied a noise modifier under the bump map section with a size of around 10-15. This creates a realistic enough water surface.
I used the same tree objects from my Halloween scene for the trees in my summer scene. I made a sphere, cut it in half, caped the borders and used soft selection to organically manipulate the polygons into a tree shape. I cloned this tree object a few times and placed them around the island scene.
For my sky I again created a half sphere to place over the whole landscape with a sky texture placed along the inside of the sphere.
I placed a few Omni lights around the scene to try and achieve a bright summers feel to the landscape.
To finish off my summer image I created a butterfly.
For the body and head I created a cylinder and used the bevel tool to create a slim body shape for the butterfly and then placed a mesh smooth modifier on it. For the wings I imported an image of a butterfly into the background and traced the wing shapes with the line tool and extruded the shape out into 3D space.
I tried using UV mapping on the butterflys wings to create a realistic texture by unwrapping the object texture and exporting it out into Photoshop. I then imported the image back into the 3Dsmax and applied the texture to the wing of the butterfly. However I then had a few problems importing the butterfly with the textures into my island scene.
These are my final images for my Summer/June scene
3D Halloween Scene
Before I started to model anything in 3D I first chose the months on which I wanted to base my models. I chose June for summer, October for Halloween and November for bonfire night. I researched these 3 holidays/months of the year and created mood boards in Photoshop to base my 3D models off.
To begin creating my first 3D scene for Halloween/October I came up with the idea of having a creep landscape with a scary castle, dead trees, gravestones, foggy atmosphere and eerie sky. I started on building the landscape first. I made a hi-res 3000px by 3000px displace map in Photoshop which I imported into 3Dsmax. I created a thin circle object and applied a displace modifier on it. By increasing the “strength” option I was able to create a realistic grassy landscape. I chose a circle object instead of a plain because I didn’t want any edges on my landscape. I then applied a mesh smooth modifier to smoothen the whole landscape.
I then began building my castle. I built my castle object out of simple box, cylinder and pyramid shapes. I used a Boolean to create the battlement shapes on the top of the castle buildings. I applied some simple stone and brick textures to make the castle appear more realistic. I also used the line tool to create the pathway up to the castle, which I extruded to make it 3D.
Once I imported the castle into the landscape scene I placed the castle into a good position.
I made my tree objects out of using thin cylinder objects with a bend modifier applied. I created the texture within Photoshop using filters and changing the colours. I cloned my tree object a few times and placed them where I wanted them within my landscape.
I also created my gravestones using a box object and with the text option typed out what I wanted on the front of the gravestone. I again cloned this object a few times and placed these onto my landscape in different areas.
To make the sky I created a large sphere, cut it in half and place my whole landscape scene within this sphere. This creates a more worldly and realistic render. Within the materials section I applied a texture to the inside of the sphere and changed the colour to a crimson red to make it more Halloween like. I also applied a noise texture over the top.
Lastly I wanted to create a fog like atmosphere around the landscape, so I added a couple Omni light sources and a camera. Within the atmosphere and effects panel I added some fog. I decreased the density and the opacity of the fog so It would be a subtle effect.
These are the final Halloween/October images.
Monday, 20 October 2008
Lighting in 3DSmax
Within 3DSmax there are many different types and techniques of lighting your scene.
My image above consists of random shapes with a TargetSpot light pointed at the scene.
Within the TargetSpot parameters there are lots of options to customize the lighting.
Such as adding shadows and type of shadows (Ray Traced, Mental Ray, Shadow Map etc) This affects the general quality of the render.
Under the advanced effects you can also had maps to be projected by the light. In the image below I added a Speckle Map to be projected onto the scene.
In the image underneath I used a light called Omni to light my scene. I placed two different Omni lights in different areas and added Ray Traced shadows.
Monday, 6 October 2008
Creating and Applying Textures
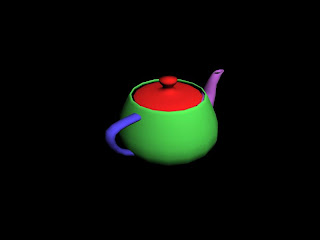
Applying different textures to the same object.
Using a teapot for example. Convert teh teapot to an editable poly. Choose elements
and when under polygon properties select each part of the teapot and click next to Set ID.
Then in the material library under multi-subobject you can assign each numbered part of the object a different colour or texture.
Applying your own textures to objects.
To create your own texture to use within 3dsmax I used photoshop. I created a new 512px by 512px file, and i used filter>render>fibres to create an image that looked like tree bark. All I had to do then was to adjust the hue/saturation to get the right colour. I also used filter>render>difference clouds for other objects.
Once I had my final image I saved it out as a bitmap image. Within 3dsmax I created my object and within the material library I clicked the small box next to the diffuse selection and under bitmap I found my own image.
Once applied to my object I was able to render my object with my own texture.
Tuesday, 30 September 2008
Mood Boards
For the Halloween/October image I was aiming to create a slightly creepy and eerie feeling. I merged a series of commercial Halloween/b-movie horror movie images to create the Halloween aesthetic. I also placed images of the moon and a dead tree silhouette.
For the June/Summer image I wanted to create a warm, bright and bold image. I thought a colourful landscape with a bright sun with trees and bushes etc would capture the feeling and the warmth of summer.
For my guy Fawkes/November image I wanted to create the excitement of bonfire night and the fireworks.
Monday, 29 September 2008
Splines, Boolean, and the Lathe Tools
Today I began learning to model using the spline feature within 3Dsmax.
Under the shapes section I selected “line” and with 2d snap off and initial type and drag type both set to smooth for a more organic shape, I created an outline for a shield.
I then converted the outline into a editable poly and extruded one side out to create the 3D shape. Once extruded the backside of the object became hollow, in order to fix this I selected the border surrounding the hollow side and clicked “cap” to complete the shape. One disadvantage to modelling using splines is the way your object doesn't have any editable segmentations you can manipulate. So you have to use the cut tool to cut editable segments of your own once the object is complete.
The line tool is very good for creating things like pottery, bowls, drinking glasses etc by using the Lathe tool with the line tool. By placing points that will make up one side of the object in the front view port, you can use the Lathe tool to make a 3D shape out of the outline. Although before using the lathe tool it is best to move the pivot point of the object (via the hierarchy panel) to a better position, such as the base.
To finish the object you have to apply the lathe modifier. There also numerous different settings you can change for a different object.
To create a Boolean, create one object and then another intersecting object which you want to be subtracted from the first object.
Under create, go to compound objects, click Boolean.
Choose whether you would like object A subtracted from object B or the other way round.
You can also unite two objects together to create one object by selecting union.
For pro boolean you can create multiple objects subtract from another.
Make sure the “base” object is selected before you use pro boolean.
Click “start picking” and you can take away multiple objects from the base object.
Monday, 22 September 2008
Favourite Month and Cartoon Character
My name is Richard King, I’m 20, and currently living in Chelmsford.
What is your favourite month of the year, what makes it so memorable to you and why?
Never really thought about it. There are the obvious ones like Christmas, Easter, and the month of your birthday but I’m guessing that they are a bit too obvious.
Maybe Halloween? Although I’ve never been one to dress up, I do enjoy the artistic imagery that accompanies Halloween. There’s been a few songs recorded by various punk rock bands which also sing about it, and personally I don’t think you can go wrong with the many, many zombie/vampire movies that feature Halloween.
However I think July is a pretty good month to go with, the weathers nice and I can always remember having a lot of fun. Seeing friends, going out, and meeting new people.
Favourite cartoon character?
When I was a lot younger I did tend to enjoy the animated Batman and Spiderman shows that were on TV at the time, but I guess they are more like comic book characters than cartoon characters.
I think my favourite cartoon character would have to be “Shake” from the TV program Aqua Teen Hunger Force.
He's crude, insulting and loud. It makes for a pretty funny combination. Funny character.
3D Fruit
Creating the fruit within 3DSmax -
To begin with I created one sphere, which I converted to an editable poly.
Within the soft selection feature I start picking different parts of the sphere and pulling out to make the sphere appear more lumpy in different areas. This changed my perfect sphere into a more organic shape, such as an apple.
To create the stalk I first used a cylinder and changed it into an editable poly to change the shape so it's bigger at one end and smaller at the other. I also applied a bend modifier to bend the shape into a more organic/apple stalk shape. I then rotated and moved the stalk into position at the top of the apple. I then grouped both of the objects into one and cloned the object.
I then found I had run into a problem with applying colour and texture because I had grouped
the apple with the stalk together as one object. So when applying the colour or texture it was applied to both objects as once. Which means I should have applied colour or texture before grouping
for the grapes I made a sphere and used the soft selection again to make a more organic shape before shrinking it and cloning the object. I did however have a problem moving the grapes into a realistic position because of the four different view points.
Finally for the surface I just created a thin rectangle shape and applied a default wooden texture for realism.
Subscribe to:
Posts (Atom)